Monday 30 July 2012

Enchanted Family Album

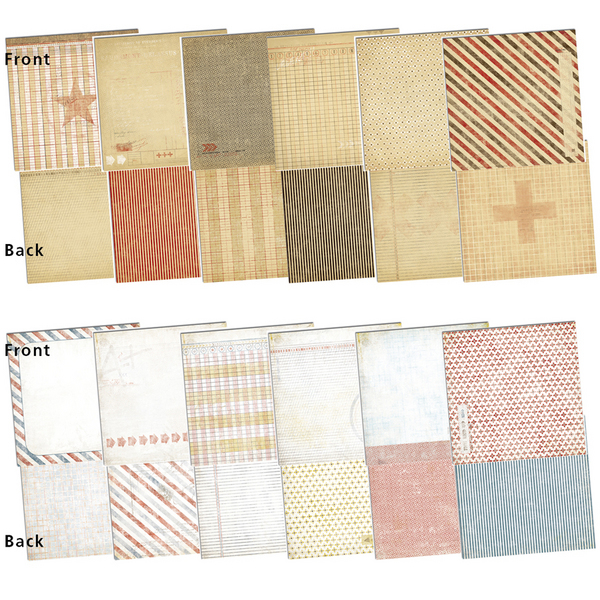
Enchanted family album
 
 
As soon as I saw the new Enchanted papers from Craft Time I thought of the old cabinet cards I have of my family. I used a new binding method I have learnt called "stack the deck". This is a really easy , quick method to make your own book, the inventor recommended using envelopes as the pages but I had the idea of using the Woodware cd selves. They make nice sturdy pages and cover and have the bonus of being the perfect colour too. Here is what I used and how I made it.
You will need -
 
* Woodware Cd sleeves - 12 pack ( I used 6 for my book )
* Craftime Enchanted A4 Printed Papers
* Craftime Enchanted Metal Roses
* Craftime Enchanted Ribbon
* Craftime Enchanted Rub Ons White
* Craftime Enchanted Pearl Gems
* Scraps of craft card - for your binding
* Magnetic dots
* Double sided tape
* PVA
* Silicone glue
How to put it together-
1. Put 6 of the Cd cases together using PVA glue
2. Make up your "Stack the deck" binding - a)Bottom layer - Cut a strip of card 2.75 " x length of your page then score at 3/4" from right side and 3/4 " from left side
b) middle layer - 2.25" x length of page scored at 3/4 from right side and 3/4 form the left
c) top layer - 1.75 x length of page scored at 3/4 from right side and 3/4 from left
3. Stack them on top of each other and glue together.

4. Apply double sided tape to both sides of the flaps on your binding and then stick them to the inside of the Cd cases, these will give you your pages.
5. Now to decorate your book. Cut the papers to fit your pages. You get 2 of each so I used 1 to cover the page and then cut the flowers out of the other and decoupaged them on top.
6. For the cover I cut a strip long enough to go around the front cover, spine and about an inch onto the back cover. If you want to put a magnetic dots onto your cover for the metal flower closure, do this before you stick the paper down. Stick the front piece to the front cover crease the spine fold but don't stick down, the stick the remaining strip to the back cover.
7. Now stick your ribbon onto the back cover. Cut a piece of paper for the back cover and stick down.
8. Add your photos and embellishments to your page as you wish. Finish off with the rub ons, which a great to use and pearl gems. Glue the metal rose to the end of your ribbon closure and snap your album closed.


Wednesday 25 July 2012

7 Gypsies Trousseau & Postale

We have two new collections from 7 Gypsies.

 Firstly, Trousseau reminiscent of fading shabby wallpaper, with vintage ephemera and fabulous old photographs.

We have six 12x12 double sided papers,
Always

Charming

Dearest

Grace

Lovely

True

a 6x6 48 sheet paper pad
48 sheets, 8 each of 6 designs

and a coordinating clear stamp set

18 piece clear stamp set


Both obviously are based on a postal theme, Postale has a crisp new feel about it while Antiquaries is aged and faded.

12 new double sided 12x12  papers in all, 6 in each collection
(3 from each collection pictured)
Postale Airmail

Postale Arrows

Postale Ledger
Antiquaries Numero

Antiquaries Parcel

Antiquaries Post

a matching 6x6 paper pad

48 sheets, 4 each of 12 designs
 and a coordinating clear stamp set

16 piece clear stamp set
All can be found on our website here any questions just ask...

Monday 23 July 2012

Olympic Record Book & UTEE Pendants

If you saw the fabulous record book & Pendants Katrina posted on Face book and have been waiting patiently for the full instructions here they are...finally!

I used -
* Bare Chipboard Album Tabbed
* Eco Green Acrylic Paints - Green patina, Gold, silver and bronze
* Vintedge Collection Pack
* Vintedge Paper Twine 15yds
* Craftime Britannia Ribbons
* Exquisite Pigment Ink - Lapis
* Craftime Britannia Laser Mesh Sheets

How I made my book -
1. Use the fantastic paint to paint your book. I used the green patina for the covers and the back page then used the gold, silver and bronze for each of the tabs. Leave to dry,
2. Trim the papers down to fit your pages. If you like the inky look, ink around the edges with the Lapis ink and the to add the dotty pattern apply ink with a sponge through the mesh sheets in a random way.
3. For the front cover I used a image from the collage sheet paper from the collection pack along with the word London. I cut the other words with my Cricut but you could use any letters you like.
4. On the back page I used an off cut of paper to make a pocket to add any keepsakes. Put you book together and add the ribbons to the book rings.


So now you can make it your own, my plan is to add the medals won as they happen to the appropriate page and use the other pages to add memories and journalling along the way. But you could add pictures and journalling of how you celebrated the year the Olympics came to London.
 
 
UTEE Pendants


Before we start just a bit about the difference between normal embossing powder and UTEE (Ultra thick embossing enamel). Embossing powder, which is very fine granules, like powder is usually used on top of a stamped image, although there are lots of other things you can do with them. The granules are fine enough to stick to the ink and keep the fine stamped lines of the image. They are then heated with a heat gun and melt into a raised line. With UTEE the first thing you will notice is it has much larger granules, like sugar. So not good for using over a stamped image but great for melting and pouring into shapes and covering large areas. Again there are lots of ways to use it and things to make with it. If you have any questions just ask but do have a play with them, they are such good fun. Just watch your fingers as they get very very hot!!

So here is how I use UTEE in my melt pot. If you don't have a melt pot you can still use UTEE. You will need a heat gun, a hair drier won't do the job as it blows air and will just blow your powder all over your table and also its just not hot enough. You can hold the little pie trays with a wooden peg, the tray gets very hot, and use your heat gun to heat from the bottom till the powder melts. If you have a melt pot though get it out, heat it up to UTEE -

I used -
* Melt Art Texture Treads Mod Circles
* Imagination Crafts Magi Boss Chunky Mother of Pearl
* Cosmic Shimmer Malachite Fire 20ml UTEE
* Metal pie trays, the small ones
* Wooden cocktail stick
* Wooden peg
* Melt pot or heat gun
* Mould of some sort like a small cookie cutter or as I used the plastic inside of a roll of tape!
1. Put the powder into a little pie dish
2. Place the pie dish into the melt pot. You can just pour the powder into the melt pot but then you have to clean it out and you can only melt one powder at a time. This way you can get 3 pie dishes in, just. Pop the lid on and wait till it melts.
3. In the mean time decide where you wish to pour on the Texture tread and place your mould over the area.
4. Once the powder is molten carefully pop a wooden peg onto the dish as a handle and pour the molten powder into the mould to cover the bottom.
5. As quickly as you can put a cocktail stick into the top of your mould if you want to use it as a pendant and leave to cool.
6. Remove from the texture tread and push out of your mould. Then make some more!!
7. If you don't like the way it turned out just throw it back in to the tray and re melt it and pour it again, the same with any little bits you get, just throw them back in the dish. Once you have finished leave all the dishes to cool, stack them on top of each other and store. When you want to play with them again jut pop the dish with the solid UTEE onto the hot melt pot and off you go again. You can of course mix your powders and molten powder together if you like.

The examples were all made this way, the top 3 were made with the mould, the one on the bottom in the middle is a piece of sequin waste punched out with a circle punch and put at the bottom of the mould then the mother of pearl poured over the top. The gold and blue ones at the bottom were just poured free hand straight onto the texture tread.
I know the texture treads are an investment but other ideas of how to use them coming up!


Friday 20 July 2012

Kaisercraft Miss Match & Clear Acrylic Stamps

The Kaisercraft Miss Match range is a fabulous mixture of all sorts; patterns, plains, ephemera and puzzles all in gorgeous faded vintage colours.

Featuring 12x12 papers with fabulous names such as Bric a Brac and Clutter; all double sided of course...

Bric a Brac

Clutter
and not forgetting the wonderful Bingo Clear stamps


Miss Match Clear Stamps

and a huge pile of Collectables cardstock ephemera!
Miss Match Collectables
It is a fabulous collection which will coordinate nicely with vintage ephemera items and give a slightly feminine slant to any Steampunk projects

Also from Kaisercraft are some lovely Vintage themed and Background texture stamps.
All stamps are clear acrylic 'cling' stamps. Use with your acrylic blocks.
Vintage Love


Graffiti


Wednesday 18 July 2012

£1 Button Assortments...

Our £1 Button assortments are always popular, 30g for only £1.

It is a random assortment so you never know what you are going to get!

We have a couple of  new colourways...


...and the return of old favourites

Sunday 15 July 2012

Ruby Rock-It Nostalgia

Another fabulous range from Ruby Rock-It.

Ruby Rock-It Collection Pack


The Nostalgia line of double-sided papers will give you the perfect olden day styling for your next paper project!
Intense, Vivid, Retro Colours on
200gsm Double Sided Cardstock and 200gsm Glittered Cardstock and a really useful collection pack if you can't decide which papers you like best.