I love to make my own boxes and once you know how they are so simple to do you will too. Over the next 3 tutorials I will show you how to make any 4 side box in what ever size you choose.
In this tutorial I will show you how to make a square box out of cardstock. I will be using the Hougie board to make mine but you can do it with a ruler and bone folder if you like. Also I will give you a couple of ideas for decoration and explain how you can use this method to make any box any size.
OK, first a few words about the Hougie board. Now I am not a need everything crafter, if I buy a tool it has to do a job I couldn't do without it. Now saying that I had bought another of the scoring boards and although I liked it I found it didn't always have the measurement I wanted so I decided to give the Hougie board a try and I must admit it was so much better. There are a couple of things I don't like about it, the colour and the tool that comes with it but it dose the job very, very well and has every measurement you could possibly need, inches on one side and cm on the other, so you can decide how deep you want every part of your box and you are not dictated too as you are with the box makers. So if you have been thinking about a score board I would recommend the Hougie.
So lets make our box. For this tutorial I will be using -
* Hougie board
* Coredinations cardstock
* Embossing folder and machine
* Wet glue
How to size your box
Now sizing your box is very simple and works the same what ever size or shape you want or if you prefer inch or cm's. Here is how I do it -
1. Decide on the size box you need, that will be your base number.
2. Decide how deep you want your box to be, that is your side number
3. Work out the size card you need to cut by adding together-
side + base + side = cardstock size cut twice
So lets say we want a square box 4 inch square with 2 inch deep sides so we would need -
side ( 2" ) + base (4") + side ( 2" ) = cardstock size 8" square cut twice
But what if you don't want a square but a long thin box? The way you work it out is the same but you will Need to do it twice to get your cardstock size. By playing with the base and side measurements you will get different size and shape boxes. Back to the long thin box, say a 6 inch long by 3" wide box with a 1 inch side -
side ( 1" ) + base length ( 6" ) + side ( 1" ) = cardstock length size 8"
side ( 1" ) + base width ( 3" ) + side ( 1" ) = Cardstock width size 5"
So you need a piece 8x5"
We will be making a long thin box in the next tutorial
Just one other thing before we make our box You need to cut your card out twice, one for the base and one for the lid but if you keep them both the same size the lid won't fit over the base, so you need to cut the base piece slightly smaller. I always cut 3/16 " off 2 sides of the base piece of cardstock and that is usually enough to get the lid to fit.
OK, lets make a box!!
1. You need to decide on your box size and cut out the card stock accordingly. For this box I have decided to do a box with a 4" base and 1" side so I worked out -
side ( 1" ) + base ( 4" ) + side ( 1" ) = cardstock size 6" x 6"
So I cut 2 6"x 6" but then cut 3/16 " off two sides of one of the squares which will be our base.
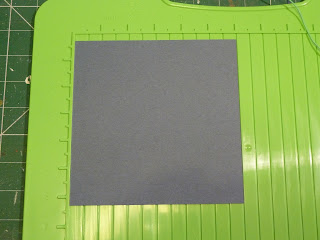
2. Place your cardstock onto your Hougie board and score at 1" and 5". Turn your card around 90 degrees and score the same. Do the same on the other piece of card too.
3. You will now notice you have 4 squares on each corner where your score lines have crossed. You need to snip the all 4 corners as shown above. Use the fold as the cut line then a diagonal cut up to it. Repeat on the other piece.
4. Your card pieces should look like this now. If you want to do something to your box like add embossing, sprays, stamps, stickers etc it is easier to do it now. Just remember the smaller size will be you base and the larger one your lid. Believe me it may sound silly but I have decorated my base as my top many times !!!
With this box I decided to put it through an embossing folder ( I used the Tim Holtz collage and notebook set ) I had to run it through a couple of times to cover the whole box. I then rubbed sandpaper over the top and then wiped it with the Dust Buster!!
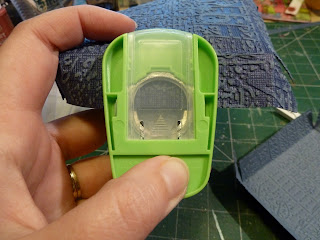
5. It looks nice and professional if you punch little half circles out of two sides of your lid. I use a circle punch to do that. Try to remember, unlike me that time, to do it before you put the box together!!
6. Now we can put our box together. Fold all your score lines and fold the little triangles into the inside of your box. Apply a wet glue, you can use tape but I find wet glue is by far the best, onto the triangle tabs as shown above
I use a little peg or paper clip to hold the joints together while they dry.
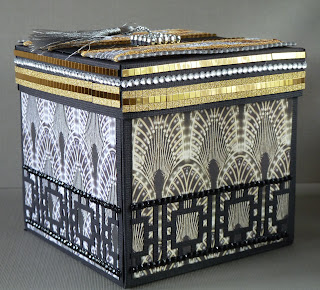
There we have it. our 4" square box
This box was also made out of a 6 x 6 " square of cardstock but has 2" sides and a 2" base. With this one I used a border punch to punch around the lid of the box before I glued it together.
I hope you enjoyed this first box tutorial and managed to make a box. Next time we will make a long thin box and put an aperture in the lid.
If you have any questions, no matter how small or silly please ask, I am happy to help.
Have fun box making, I hope you can see just how easy they are and how many uses they have.


.JPG)

.JPG)


