Showing posts with label Rubber Stamps. Show all posts

Friday, 15 March 2013

Steampunk page #3 stamping

Hi there Katrina the design Elf here with my 3rd Steampunk page to show you and this time the technique is stamping.

   Now I do have a bit of a confession to make, I got so carried away with this page I totally forgot to take any photos along the way but I will talk you through the process instead.


  OK here is how I did it.

1. I took a piece of Crafthouse Press Watch face paper and a paper for the back, cut them both at the same time using the Tim Holtz alterations cabinet card die. Then keeping them together cut to the size of your page.

2. Stamp the Artistic stamper Slow Fast stamp and 2 of the Judikins instrument block images you like twice too and cut them out. Distress them using the Tim Holtz distress ink.

3. Cut 2 pieces of acetate to fit your page and using a clear dry glue stick the stamped images back to back then to one of the pieces of acetate. Once dry stick the 2 pieces of acetate in between the 2 pieces of cut paper making sure the shapes line up.

4. Decorate the page with 7gypsies Numbers rub ons and any other embellishments you want!


I have 2 more pages and techniques to show you then onto something new!

  Happy crafting
                                           Love Katrina

Tuesday, 26 February 2013

Steampunk book cover

Hi everyone Katrina here, the Fruit Pixies design elf, to show you how I made my Steampunk book cover. So here we go.....

To make my book I used card taken from the Pizza box that the order came in, 2 squares 6.2 x 7 inches and a strip for the spine 7 x 1inches. One of the Tim Holtz Idea-ology ring binders and a selection of the Bo Bunny Timepiece collection 12x12 papers.


Choose the piece of paper you want for your cover and cut a piece 9x12 and 9x4 inches. Place the pieces face down, so the side you want for the cover is on the outside, and place your card covers on top of the paper as shown here. You will have a border all the way around and make sure there is a small gap either side of the spine so the book will open and close. The join needs to be on you back cover so you won't see it in the end. Use a wet glue, I use PVA to stick the paper to the covers making sure you leave the gap between the covers and spine. Leave to dry.


Mite all 4 corners and then using a bone folder or back of you scissors score around the outside of all the covers and fold the paper over. Once folded you then stick using your PVA glue. Leave to dry.


Now we need to put in the ring binder. I found the easiest way was to attach the ring binder to a piece of contrasting cardstock. Cut it slightly smaller then the height of your book and wide enough to be scored as shown, either side of the spine of the book and lap over into the covers so you can stick it in. Once you are happy with the card, attach the ring binder using the brads that come with it and stick the card to the spine of the book using PVA. Once stuck to the spine make sure the creases are in the gaps snugly and stick the overlap to each cover with the book flat.


Next cut 2 pieces of the Bo Bunny paper to cover the inside of your book and stick down. Leave to dry.  That is our book made!! Not too bad was it?


Now the fun bit, decorating. You can decorate it any way you like but here is how I did mine.

 Over the paper on the cover I stamped with a brown ink and a script stamp and used a time template to add some detail. Don't forget the back too.


I then cut one of the Alterations Cabinet card dies shapes from the Bo Bunny paper and used the same stamps and templates to decorate that. I then used the Ranger embossing pad and wiped on some of the ink then added Aged Mahogany distress embossing powder, make sure you shake the tub first. Heated it and then added more where needed until I got the grungy look.


I then cut the different Alterations gear die cut shapes out of Grunge paper, which I then painted, card stock and scraps of the Bo Bunny papers. I then poked them out from behind the cabinet card and stuck them all down. I then added some of the distress embossing powder around the outside of the cover too.


I then took a copper plant label, Hubby is a keen gardener so I pinched a few :), rounded off the other end and ran it through the Tim Holtz texture fades pocket watch and steampunk, then covered it again with Ranger embossing ink and distress powder then heated it. Watch your fingers as it gets very hot!!


I then put it all together using the Alterations Typeface die for the title and added some of the Tim Holtz Idea-ology Sprocket gears. I added a couple of the Creative Expressions Faux screw brads to add the copper pieces to the book.

So there you have it, how I made my Steampunk book. Now all we need is some pages for the inside.

Hope you enjoyed the tutorial, any questions just ask here or on our Facebook page and I 'll try my best to answer them.

 Happy crafting

                              love Katrina

Thursday, 9 August 2012

Alice in Wonderland

Hello, Katrina here. I have been re visiting my love of stamping using the lovely IndigoBlu Alice stamp plates. I especially likes the original art from the book. I was also playing with the Cosmic shimmer chalk mists, if you are not a fan of the sparkle you get with the mica sprays or want a different look then give these a go, I love them and they went so well with the stamps.
Tea Party Alice Card


I used -
* Cosmic Shimmer Chalk Mist Pastel Blue
* Cosmic Shimmer Chalk Mist Pastel Pink
* Cosmic Shimmer Chalk Mist Pastel Purple
* 25 Craft UK A5 Card Blanks White
* IndigoBlu Rubber Stamp Plate Alice 2
* IndigoBlu Rubber Stamp Plate Alice 1
* Craftime Enchanted Paper Flowers
* Craftime Enchanted Pearl Gems
* Creative Expressions Bakers Twine Black & White 50 Yds
* edging die or punch
* Pages from Alice in wonderland
1. Use the chalk mists to spray a piece of A4 card, dry in between colours.
2. Stamp the image of Alice at the Tea party and Alice in Wonderland onto white card, cut out and mat onto black card, cut a small border. Cut or punch your border top and bottom of a mat cut from your misted card. Mount Alice onto it.
3. Cover the front of your card with the pages of your book and ink around the edges. Tie a piece of the Bakers twine around the card.
4. Cut out the Alice in Wonderland and ink around the edges.
5. Use 3D tape to attach the main image to the card and add some flowers and the Alice in wonderland, add gems to the flowers middles and you are done!
 
Sorry it's late card

My next card is a little sorry its late card. We all miss a birthday now and again and this little card is just so cute, I'm sure they will forgive you!!
I used -
* Part of the card you misted for the first card
* IndigoBlu Rubber Stamp Plate Alice 2
* Artistic Stamper Time & Keys A5 Plate
* Plain white card
1. Cut your card blank from the card and stamp the Alice Stamp image with the watch and some clock images from the time stamp plate along with the late saying and cut them all out.
2. Cut a piece of the sprayed card to fit your card and stick down. Ink around the edges.
3. Arrange all the images on the page and once you are happy stick down.
4. Cut sorry from a die cut alphabet or use sticker and your done!
Rabbit tag
 
I just had to use the rabbit image and so made up this little tag.
I used -
* IndigoBlu Rubber Stamp Plate Alice 2
* IndigoBlu Rubber Stamp Plate Alice 1
* Card you misted for the first card
* Bakers twine
1. Cut the misted card into a tag shape
2. Stamp the rabbit and cut him out, stamp curiouser and curiouser and cut out too.
3. Arrange and stick on your tag.
ATC
And lastly I made a little ATC using the Tweedledum and Tweedledee image and the rhyme from the book. Its amazing how far 1 A4 sheet of card will go.
 
All these from just 1 A4 sheet, promise!!

Wednesday, 25 July 2012

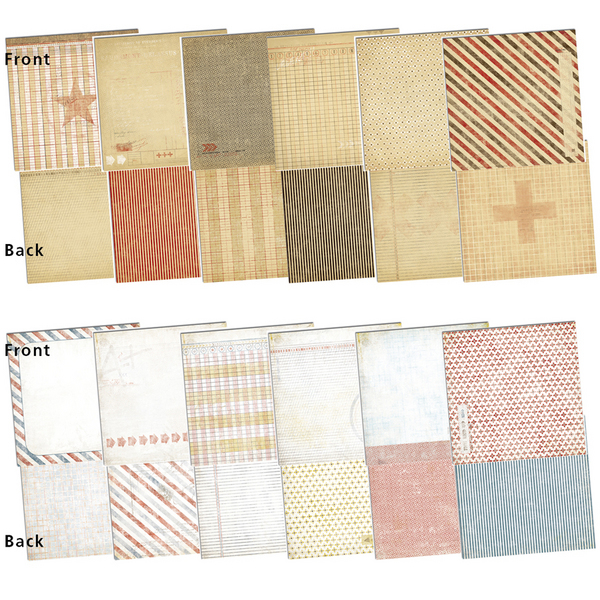
7 Gypsies Trousseau & Postale

We have two new collections from 7 Gypsies.

 Firstly, Trousseau reminiscent of fading shabby wallpaper, with vintage ephemera and fabulous old photographs.

We have six 12x12 double sided papers,
Always

Charming

Dearest

Grace

Lovely

True

a 6x6 48 sheet paper pad
48 sheets, 8 each of 6 designs

and a coordinating clear stamp set

18 piece clear stamp set


Both obviously are based on a postal theme, Postale has a crisp new feel about it while Antiquaries is aged and faded.

12 new double sided 12x12  papers in all, 6 in each collection
(3 from each collection pictured)
Postale Airmail

Postale Arrows

Postale Ledger
Antiquaries Numero

Antiquaries Parcel

Antiquaries Post

a matching 6x6 paper pad

48 sheets, 4 each of 12 designs
 and a coordinating clear stamp set

16 piece clear stamp set
All can be found on our website here any questions just ask...

Wednesday, 20 June 2012

New IndigoBlu

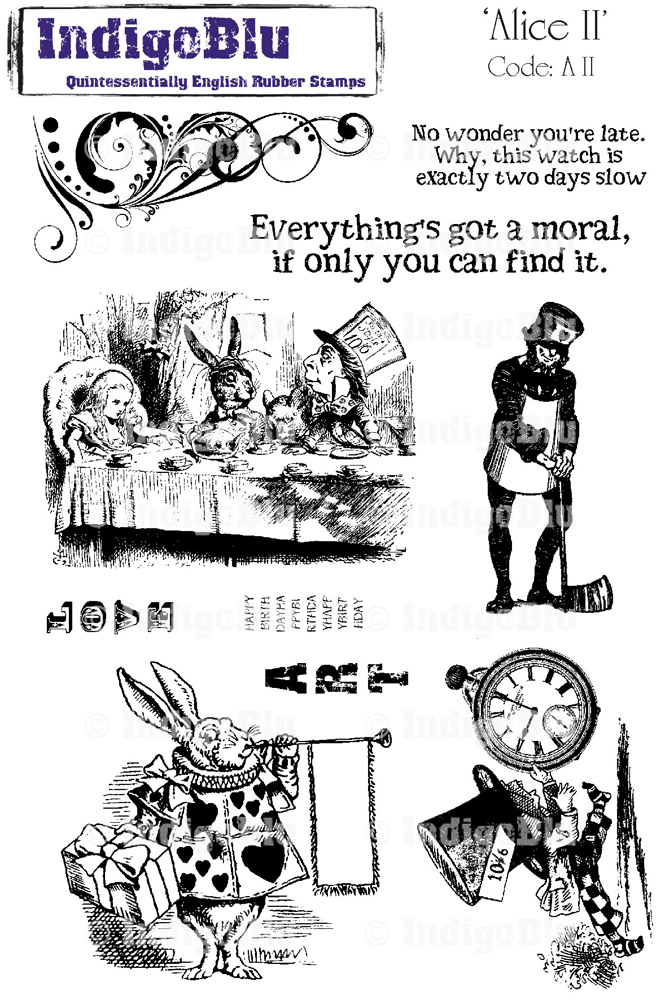
New Stamps and Accessories from IndigoBlu  including these fabulous Alice plates
Alice I

Alice II
and the very useful Sarah's Choice Plate

We are also now stocking the flitter glu starter kits with everything you need to start flittering and flaking


Sunday, 13 May 2012

Lynne Perrella Frame

I just love the new stamps from Paper Artsy Lynne Perrella and using one of my favourite techniques I came up with this frame. The frame came from the £1 shop but any frame with a deep surround will be fine.
 I used - PaperArtsy Lynne Perrella Collection LPC003
Fresco Finish Acrylics - Toad Hall
Crackle glaze
Honey dew
... London night
Tim Holtz distress ink
Template of your choice
White tissue paper
Black ink pad, one that drys on glossy surfaces
PVA glue
To alter your frame -
1. Remove the glass and rub the wood down with sandpaper and wipe off the dust. I gave my frame a coat of gesso but you don't have to. Paint the frame with the Toad Hall acrylic and leave to dry. Apply the crackle glaze with an old credit card or similar thing, if you have nothing like that just add a thin layer with a paint brush. Leave to dry or dry with a heat tool. Paint over the Honey dew and watch it crack!! Leave to dry.
2. Using your chosen template sponge through your distress ink using a piece of cut and dry.
3. Stamp out a variety of your images from the Lynn Perrella stamps on to tissue paper and once dry tear around then as close as you dare. Decide where they are all to go and then carefully, I find it easiest to use my finger, cover the backs of them with PVA glue and gently pat them into place. Leave to dry.
4. Apply some London night around the edges of your frame and once dry put your frame back together and its ready for a photo!
For close ups of the frame see Katrina's Blog

Shrink Plastic Zentangle Doll


Shrink Plastic Zentangle Doll


You will need -

* Shrink plastic
* Archival ink pad
* Artistic Stamper Art doll stamp- large
* Permanent small nib pen
* Heat tool
* Hole punch
* Jump rings, I used 7mm ones
* round nosed pliers
* Scissors


To make your doll-

1. Stamp out the body parts onto your shrink plastic. You might find it easier to put your stamp onto the table and then the shrink plastic onto the stamp. Leave to dry.

2. Decorate you doll with your permanent pen. I used Zentangle patterns to decorate mine.

3. Cut out the body parts, punch the holes on the limbs and then using your heat tool shrink them down.

4. Attach the body parts to each other with jump rings and play!!

Birdsong Card

Birdsong card

Spray an A4 sheet of card with Inkylicious Lime and one using Raspberry.
Cut out the die cut bird using the PaperArtsy songbird die from the Raspberry coloured sheet.
Stamp the bird image from PaperArtsy Hotpick plate 1005 onto the die cut.
Cover the front of your card with a piece from your Lime coloured card.
Stamp some swirls along the top with brown ink and the grass stamp and seed head along the bottom. Glue your stamped bird die cut onto your card then stamp the word song onto a scrap of the Raspberry card and cut out.
Stamp the word bird onto the card and glue the cut out bird word underneath.
Finish by stamping the little lable stamp onto the front and if you like the look run a pen around the card edge.

Octopode Factory Birthday Card

The wonderfully talented Katrina has produced a fabulous Steampunk themed Birthday card featuring one of the new Octopode Factory characters. Thus one is Winston; he looks like a cross between an eccentric professor and an Airship pilot!


Katrina's Instructions:
You will need -
* Octopode Factory Winston stamp
* Creative expression Vintage Illision stamps
* Eco Green steampunk stamp set
* Bo Bunny Timepiece 6x6 paper pad
* Alterations die Typeset alphabet
* Alterations Die Gadget Gears
* Brown ink pad
* What ever you like to colour in with
* Card blank

1. Stamp out Winston, colour him in and cut him out.
2. Stamp out the net from the Eco Green set onto some of the Bo Bunny paper and cut out.
3. Cover your card blank with your choice of paper from the Bo Bunny paper pad and stamp the cogs from Creative Expressions vintage Illisions set in the corner and the ruler from the Eco Green set at the bottom.
4. Cut out some cogs from a darker paper from the paper pack and Happy Birthday from the Alterations alphabet
5. Now all there is to do is put the card together. Stick the net stamped panel onto the card and Winston on top. Stick on the cogs and letters. I then went around the cogs and letters with a brown pen. Your card is now done.
Why not try it with some of the other characters? They are all great!

Introducing Katrina

 Our new wonderfully talented Design Team Member...
My photo


Katrina Rollings

Hello, my name is Katrina Rollings. I live with my hubby Andrew and 3 very tame cockatiels ( well 2 very tame, the other we are working on ) in Bristol.
I have been crafting most of my life, my Mum teaching me tapestry and sewing, then went on to crosstitch. I bought my first rubber stamp at a stitching fair over 20 years ago and was hooked. That lead me to scrapbooking and then about 6 years ago a friend introduced me to ATCs and my love of mixed media was born. I love the freedom that Mixed Media gives you. To be able to play with paint, ink, paper, anything you fancy really, even that ticket stub you picked up on the way home!! My favourite images and embellishments have to be vintage ones, so I am so excited to become a member of Sarah-Jane's design team. I am so looking forward to working with her fantastic products!
When I am not in my craft room I love to read, bake, watch old films or be out with my camera, Andrew and I are both keen photographers. I also look forward to our walking holidays in Austria, of course a journal, pack of blank ATCs, scissors, glue, pens, stamps and ink get snuck into the suitcase!! 

Travel Tag Book
Craft House press collage sheets - New York and Loyd Express
Manila Tags x 3
Distress ink - Tea dye, Old paper and Walnut ink and applicator
Photo from old photo collection
Slide mount
Old bus tickets
Gold safety pins
Garden string
Book papers
Travel themed rubber stamps - my own
Butcher twine - my own
How to make it -
Cut out the 2 large travel tags from the New York collage sheet. Distress the cover tags and the 3 manila tags, front and back, with the distressing ink. Cut out all the images from the 2 collage sheets and use them as well as some strips of old book paper and other ephemera to collage both sides of the tags and inside of the front and back covers. To make the slide mount, distress with ink, stamp with a script stamp and leave to dry. Tear a square of book paper, add an old bus ticket and distress with ink. Stick to middle of slide mount and stick together, punch a hole in the top and add to book with a safety pin. Tie everything together with string to finish off.
Cover

Page 1

Page 2

Page 3

Page 4

If you'd like to see more of Katrina's fabulous artwork and projects visit the Gallery and her Blog.
You'll also find her artwork scattererd throughout the website.
Thanks Katrina for joining us, we look forward to more of your wonderful work.