Showing posts with label Eco Green Crafts. Show all posts

Wednesday, 20 March 2013

Clearance Sale


Our clearance sale continues apace, while some lines have almost sold out (Fresco Finish, Eco Green Paints & Walnut Hollow Creative Metal) we are still adding reduced lines.
 
We are currently selling the following products at 50% off RRP;
 
Jenni Bowlin
Dovecraft
Jillibean Soup
Selected Bo Bunny Lines
Imagination Crafts
Eco Green Crafts
Kanban
La Pashe
7 Gypsies
Black Market Paper Society
Selected Craft UK Card Blanks
 
also all Christmas stock and wood mounted stamps are now reduced, so come and grab a bargain before it all goes...
 
New products are arriving daily and we've just opened boxes of new unmounted stamps and gilding flakes and glitters from Creative Expressions so keep an eye out for them appearing on the site in the next couple of days.
 

Monday, 23 July 2012

Olympic Record Book & UTEE Pendants

If you saw the fabulous record book & Pendants Katrina posted on Face book and have been waiting patiently for the full instructions here they are...finally!

I used -
* Bare Chipboard Album Tabbed
* Eco Green Acrylic Paints - Green patina, Gold, silver and bronze
* Vintedge Collection Pack
* Vintedge Paper Twine 15yds
* Craftime Britannia Ribbons
* Exquisite Pigment Ink - Lapis
* Craftime Britannia Laser Mesh Sheets

How I made my book -
1. Use the fantastic paint to paint your book. I used the green patina for the covers and the back page then used the gold, silver and bronze for each of the tabs. Leave to dry,
2. Trim the papers down to fit your pages. If you like the inky look, ink around the edges with the Lapis ink and the to add the dotty pattern apply ink with a sponge through the mesh sheets in a random way.
3. For the front cover I used a image from the collage sheet paper from the collection pack along with the word London. I cut the other words with my Cricut but you could use any letters you like.
4. On the back page I used an off cut of paper to make a pocket to add any keepsakes. Put you book together and add the ribbons to the book rings.


So now you can make it your own, my plan is to add the medals won as they happen to the appropriate page and use the other pages to add memories and journalling along the way. But you could add pictures and journalling of how you celebrated the year the Olympics came to London.
 
 
UTEE Pendants


Before we start just a bit about the difference between normal embossing powder and UTEE (Ultra thick embossing enamel). Embossing powder, which is very fine granules, like powder is usually used on top of a stamped image, although there are lots of other things you can do with them. The granules are fine enough to stick to the ink and keep the fine stamped lines of the image. They are then heated with a heat gun and melt into a raised line. With UTEE the first thing you will notice is it has much larger granules, like sugar. So not good for using over a stamped image but great for melting and pouring into shapes and covering large areas. Again there are lots of ways to use it and things to make with it. If you have any questions just ask but do have a play with them, they are such good fun. Just watch your fingers as they get very very hot!!

So here is how I use UTEE in my melt pot. If you don't have a melt pot you can still use UTEE. You will need a heat gun, a hair drier won't do the job as it blows air and will just blow your powder all over your table and also its just not hot enough. You can hold the little pie trays with a wooden peg, the tray gets very hot, and use your heat gun to heat from the bottom till the powder melts. If you have a melt pot though get it out, heat it up to UTEE -

I used -
* Melt Art Texture Treads Mod Circles
* Imagination Crafts Magi Boss Chunky Mother of Pearl
* Cosmic Shimmer Malachite Fire 20ml UTEE
* Metal pie trays, the small ones
* Wooden cocktail stick
* Wooden peg
* Melt pot or heat gun
* Mould of some sort like a small cookie cutter or as I used the plastic inside of a roll of tape!
1. Put the powder into a little pie dish
2. Place the pie dish into the melt pot. You can just pour the powder into the melt pot but then you have to clean it out and you can only melt one powder at a time. This way you can get 3 pie dishes in, just. Pop the lid on and wait till it melts.
3. In the mean time decide where you wish to pour on the Texture tread and place your mould over the area.
4. Once the powder is molten carefully pop a wooden peg onto the dish as a handle and pour the molten powder into the mould to cover the bottom.
5. As quickly as you can put a cocktail stick into the top of your mould if you want to use it as a pendant and leave to cool.
6. Remove from the texture tread and push out of your mould. Then make some more!!
7. If you don't like the way it turned out just throw it back in to the tray and re melt it and pour it again, the same with any little bits you get, just throw them back in the dish. Once you have finished leave all the dishes to cool, stack them on top of each other and store. When you want to play with them again jut pop the dish with the solid UTEE onto the hot melt pot and off you go again. You can of course mix your powders and molten powder together if you like.

The examples were all made this way, the top 3 were made with the mould, the one on the bottom in the middle is a piece of sequin waste punched out with a circle punch and put at the bottom of the mould then the mother of pearl poured over the top. The gold and blue ones at the bottom were just poured free hand straight onto the texture tread.
I know the texture treads are an investment but other ideas of how to use them coming up!


Sunday, 13 May 2012

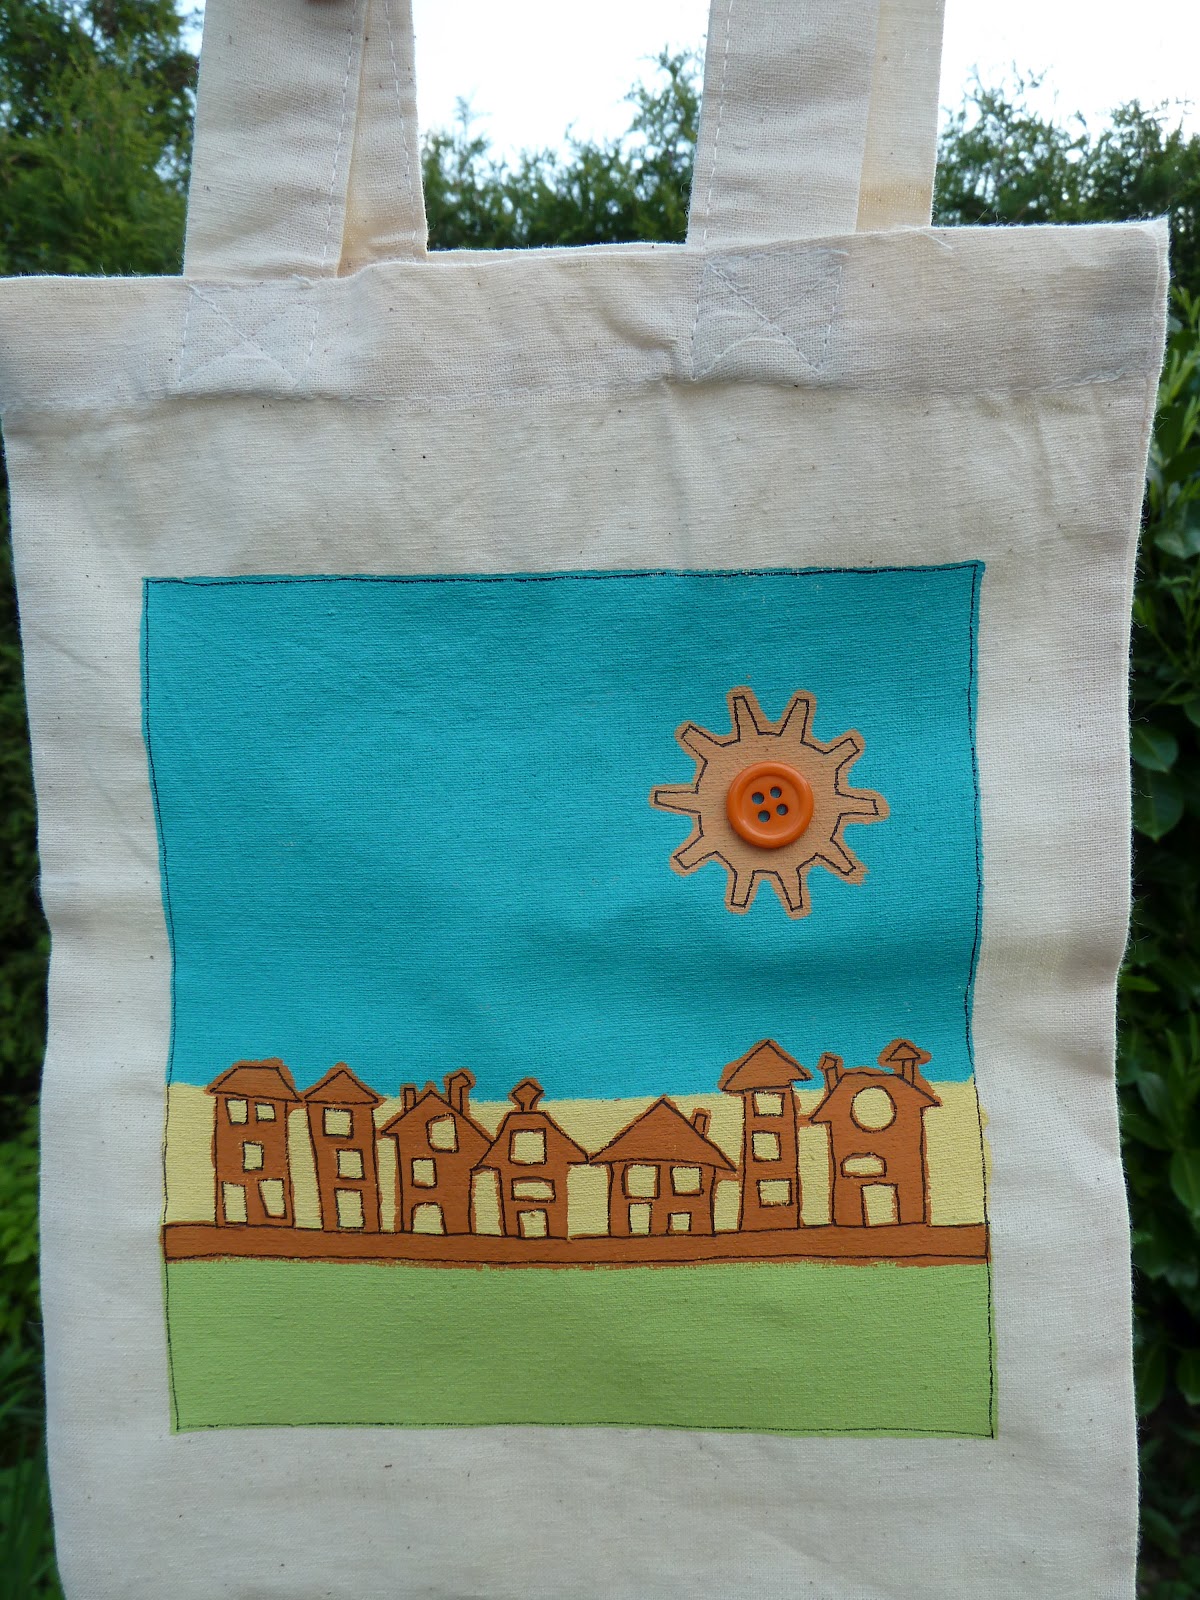
House Bag & Spotty Bag

House Bag

Take 1 Eco cotton bag and cut a piece of stiff card, like cereal box card , and cover it in a plastic bag. Place this inside the canvas bag to prevent it sticking together.
Using masking tape tape off your design area and the horizon at the bottom of your sky.
Make sure it is all well stuck down. Paint the sky with Eco Green Acrylic paint ( I used waterfall ) Leave to dry. Then tape off the top of the grass leaving a gap between the sky and grass.
Paint this with Eco Green Acrylic paint ( I used Lime for this ) leave to dry.
Then paint the in between bit, you could use something like stone.
Using the Tim Holtz Alterations Town scape die cut out a piece of funky foam and stick onto a piece of clear packaging. Do the same with the Tim Holtz Alterations Gadget gears, the small one.
Remove the horizontal tape from your bag, add paint to the townscape stamp ( I used pumpkin ) and stamp onto the bit in between the sky and grass. Do the same with the small gear stamp with the same colour to make the sun.
Fill in any missed bits with a paint brush and leave to dry. Remove all the tape and using a permanent black marker pen outline the houses, sun and around the whole design, don't worry about wobbly lines it all adds to the look of your bag.
Select a button from the brights button bag and stick to the middle of the sun using Imagination crafts magi bond. Once the glue is dry remove the card and you are ready to go shopping!!


Spotty Bag

Spotty canvas bag

Take 1 Eco Cotton bag and using masking tape, tape off the area you wish to paint making sure it is well stuck down.
Cut some stiff card, like a cereal box, to the size of your bag and put that into a plastic bag. Place this inside your canvas bag to prevent it sticking together.
Paint your background colour in using the Eco Green Acrylic paint ( I used Lime ) and leave to dry.
Use a circle punch or die punch a circle out of funky foam and stick that to a piece of clear packaging to form your own foam stamp.
When the background is dry paint your circle stamp with a different colour Eco Green Acrylic paint ( I used Raspberry ) and stamp onto your bag, you may have to fill in the little bits the stamp misses free hand. Leave that to dry.
Select buttons from the button assortment packs ( I used the brights ) and stick to the middle of the circles with Imagination crafts magi bond, this has the best tiny nozzle I have ever used.
Once everything is dry remove the tape and card from inside and you are done!!

Chinese Triptych

Chinese Triptych

Katrina used -

* Card stock
 * 20 Assorted Josss paper pack

* Assorted Oriental Ephemera

* 12 Crafthouse Press Oriental Woodcut Prints

* Replica Chinese coin

* Alterations Die Vintage lace

* Imaginations Crafts Magi Bond

* Eco Green Acrylic Paint Pure Gold

* Craft time Silicone glue

* Hougie board - optional


1. Cut a piece of card 8x5" and sore a line at 2" and 6" so you get 3 panels, 2" 4" 2".

2. Apply PVA glue to the middle panel and stick one of the Joss papers. Don't worry if it goes over into the other panels, it is so thin it won't show. Cover the side panels in the same way.

3. Cut out one of the wood cut images and glue it to the left hand panel. Cut the images from the chopstick wrapper and glue them down the right panel.

4. Cut a length using the Alterations vintage lace die from a co-ordinating paper or card ( I used the wrapper from my Chocolate bar I was eating at the time, well you have to have chocolate when you are crafting and I'll use anything in my projects!! ) and glue it to the top and bottom of the middle panel.

5. Paint the Eco Green pure gold paint round the edges of your triptych and around the images from the chopstick wrapper to help them blend in.

6. Glue a Chinese coin the top of the left panel and bottom of the right one using silicone glue, leave to dry and you are finished!

Octopode Factory Birthday Card

The wonderfully talented Katrina has produced a fabulous Steampunk themed Birthday card featuring one of the new Octopode Factory characters. Thus one is Winston; he looks like a cross between an eccentric professor and an Airship pilot!


Katrina's Instructions:
You will need -
* Octopode Factory Winston stamp
* Creative expression Vintage Illision stamps
* Eco Green steampunk stamp set
* Bo Bunny Timepiece 6x6 paper pad
* Alterations die Typeset alphabet
* Alterations Die Gadget Gears
* Brown ink pad
* What ever you like to colour in with
* Card blank

1. Stamp out Winston, colour him in and cut him out.
2. Stamp out the net from the Eco Green set onto some of the Bo Bunny paper and cut out.
3. Cover your card blank with your choice of paper from the Bo Bunny paper pad and stamp the cogs from Creative Expressions vintage Illisions set in the corner and the ruler from the Eco Green set at the bottom.
4. Cut out some cogs from a darker paper from the paper pack and Happy Birthday from the Alterations alphabet
5. Now all there is to do is put the card together. Stick the net stamped panel onto the card and Winston on top. Stick on the cogs and letters. I then went around the cogs and letters with a brown pen. Your card is now done.
Why not try it with some of the other characters? They are all great!

Steampunk Artdoll

The Steampunk style is really pushing through to mainstream now even though the 'genre' has been around since the 80's. This is a great way to try out the Steampunk style on a smaller scale. There are loads of papers, stamps and bits and pieces around now that fit right in with the Steampunk theme.
If you fancy stretching your mechanical wings more give this fabulous project a try.
Happy Steaming!!!


Steampunk Artdoll -

I used the following - * Die cut paper doll with brads
* Bo Bunny 6x6 Timepiece collection
* Daisy Bucket clearly Petite sprocket stamp
* Eco Green chipboard sprockets
* Eco Green steampunk stamp set
* Tim Holtz movers and shakers sprocket dies
* Eco Green Acrylic paint - skin colour
* Ranger crackle paint

I also used - * Faces from pictures or magazines or draw them yourself
* Hat, tie and bag from an old catalogue or a magazine
* Wire to make her glasses and a piece of chain and eye pin to make the tie pin and chain
* Decorative pearls and feather from my pet Cockatiel( he was moulting promise! )

How I put her together -

1. Pop out all your paper doll bits. You might want to give her a bit more of a waist, draw more of an hour glass figure and cut along the lines. Paint the neck and arms skin colour. Choose your face and glue to the head, trim any excess card off around the face and make the neck fit the face by trimming down.

2. Use your dolls body and arm as templates, draw round them on the back of your choice of paper then design your top around them. Remember the way your pattern runs on your paper. Cut them out.

3. Attach your legs to your body, any brad will do as you won't see them and then lay them on the back of your chosen paper for your skirt and design the skirt you want. Cut out. Use a tiny scrap of the card from the leftover of your doll to make heels for your dolls boot/shoes. Stick the heel to the back of the foot and re-shape the foot to look like a boot/shoe and paint them. Use a pen to add detail once dry.

4. Now you have all the basics done its time to decorate your doll's clothes. I used the movers and shakers sprockets and cut them out of the dark red plain paper and added them to her skirt. Stamped the sprocket stamp on the sides of her top. Using the steampunk stamp set stamped the words and small dream and believe onto old book paper, cut out and stuck the larger words to her skirt and small ones to the top of her sleeves. Her hat, tie and bag came from an old catalogue but you could either make them yourself or cut out from a magazine. Her hat was decorated with a painted chipboard sprocket and then crackled with the ranger crackle paint and a feather donated by Dexter , one of my cockatiels.

5. Her glasses were simple to make. Use some thin wire and wind one end around the end of something that is the size you need and secure by twisting the wire round itself a few times. Take whatever you used to make the round and place it right next to the formed circle, bring the wire over your form and secure again over what will be the nose part of your glasses. Cut off with wire cutters NOT your best scissors and play about with them till you are happy. I glazed mine with a product called fantasy film but you don't have to. You can add a chain and pin like me if you would like then all you have to do is add all those little bits to make it yours. Enjoy!