Showing posts with label Vintage. Show all posts

Tuesday, 19 March 2013

Steampunk technique book page#4 embossing folders

Hi there, design elf Katrina here with the penultimate page in my Steampunk technique book. This time using your embossing folders in a slightly different way.

Here is how I achieved my look


Place your embossing folder, I used the Tim Holtz Pocket watch and Steampunk texture fade for this page but any embossing folder will do, place under your chosen Bo Bunny Time piece paper.


Using a wax crayon, I used 2 different colours, rub over the paper and you will pick up the texture pattern from the embossing folder underneath


Then add your ephemera. I used a scrap of music paper and gramophone paper but you could do this technique on any card or scrapbook page.

Happy crafting!
                                     Love Katrina

Friday, 1 March 2013

Steampunk page - masking tape technique

Hi there Katrina the resident Fruit Pixie designer here with my first page of my Steampunk book. My idea for this book was to share my favourite mixed media techniques, so here is the first one, using masking tape!!

  I would like you to meet Mr and Mrs Hunt and their little pet Horris. Mr Hunt is an inventor of wondrous things, including their little pet too I think!  Here is how I made their page.


First I cut a cabinet card shape from the Alterations cabinet card die out of a stiff card. It could be a cereal box card as you wont see the back. I then ripped up pieces of masking tape and covered the shape, layering one strip on top of the other slightly to give lots of texture. Burnish it down well with the end of a ruler or bone folder.


Make up the colour of your choice from the Imagination Crafts mica powder kit with the magi bond it comes with, into a wonderful paint and cover your masking tape. You can add a second colour too if you wish. leave to dry.


Cover your page with the Bo Bunny Timepiece collection paper and add your masking tape cabinet card on top.


Add images and embellishments, I chose one of the steampunk clock charms and the Tim Holtz light bulbs which are no longer available at the Fruit Pixie.

 Now I covered a cabinate card shape for this page but you can use this technique on anything you like for cardmaking and scrapbooking. It gives a lovely textured finish and using the mica powder paint has a wonderful two tone sheen too. Why not have a go.

Happy crafting
                           Love Katrina


Monday, 30 July 2012

Enchanted Family Album

Enchanted family album
 
 
As soon as I saw the new Enchanted papers from Craft Time I thought of the old cabinet cards I have of my family. I used a new binding method I have learnt called "stack the deck". This is a really easy , quick method to make your own book, the inventor recommended using envelopes as the pages but I had the idea of using the Woodware cd selves. They make nice sturdy pages and cover and have the bonus of being the perfect colour too. Here is what I used and how I made it.
You will need -
 
* Woodware Cd sleeves - 12 pack ( I used 6 for my book )
* Craftime Enchanted A4 Printed Papers
* Craftime Enchanted Metal Roses
* Craftime Enchanted Ribbon
* Craftime Enchanted Rub Ons White
* Craftime Enchanted Pearl Gems
* Scraps of craft card - for your binding
* Magnetic dots
* Double sided tape
* PVA
* Silicone glue
How to put it together-
1. Put 6 of the Cd cases together using PVA glue
2. Make up your "Stack the deck" binding - a)Bottom layer - Cut a strip of card 2.75 " x length of your page then score at 3/4" from right side and 3/4 " from left side
b) middle layer - 2.25" x length of page scored at 3/4 from right side and 3/4 form the left
c) top layer - 1.75 x length of page scored at 3/4 from right side and 3/4 from left
3. Stack them on top of each other and glue together.

4. Apply double sided tape to both sides of the flaps on your binding and then stick them to the inside of the Cd cases, these will give you your pages.
5. Now to decorate your book. Cut the papers to fit your pages. You get 2 of each so I used 1 to cover the page and then cut the flowers out of the other and decoupaged them on top.
6. For the cover I cut a strip long enough to go around the front cover, spine and about an inch onto the back cover. If you want to put a magnetic dots onto your cover for the metal flower closure, do this before you stick the paper down. Stick the front piece to the front cover crease the spine fold but don't stick down, the stick the remaining strip to the back cover.
7. Now stick your ribbon onto the back cover. Cut a piece of paper for the back cover and stick down.
8. Add your photos and embellishments to your page as you wish. Finish off with the rub ons, which a great to use and pearl gems. Glue the metal rose to the end of your ribbon closure and snap your album closed.


Wednesday, 25 July 2012

7 Gypsies Trousseau & Postale

We have two new collections from 7 Gypsies.

 Firstly, Trousseau reminiscent of fading shabby wallpaper, with vintage ephemera and fabulous old photographs.

We have six 12x12 double sided papers,
Always

Charming

Dearest

Grace

Lovely

True

a 6x6 48 sheet paper pad
48 sheets, 8 each of 6 designs

and a coordinating clear stamp set

18 piece clear stamp set


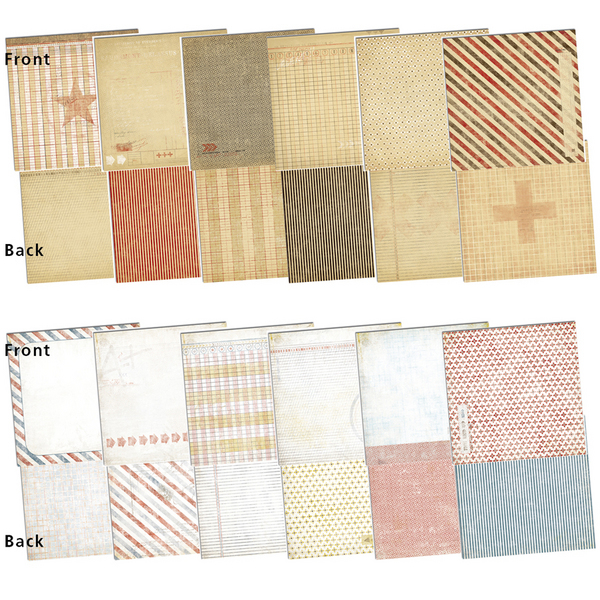
Both obviously are based on a postal theme, Postale has a crisp new feel about it while Antiquaries is aged and faded.

12 new double sided 12x12  papers in all, 6 in each collection
(3 from each collection pictured)
Postale Airmail

Postale Arrows

Postale Ledger
Antiquaries Numero

Antiquaries Parcel

Antiquaries Post

a matching 6x6 paper pad

48 sheets, 4 each of 12 designs
 and a coordinating clear stamp set

16 piece clear stamp set
All can be found on our website here any questions just ask...

Friday, 20 July 2012

Kaisercraft Miss Match & Clear Acrylic Stamps

The Kaisercraft Miss Match range is a fabulous mixture of all sorts; patterns, plains, ephemera and puzzles all in gorgeous faded vintage colours.

Featuring 12x12 papers with fabulous names such as Bric a Brac and Clutter; all double sided of course...

Bric a Brac

Clutter
and not forgetting the wonderful Bingo Clear stamps


Miss Match Clear Stamps

and a huge pile of Collectables cardstock ephemera!
Miss Match Collectables
It is a fabulous collection which will coordinate nicely with vintage ephemera items and give a slightly feminine slant to any Steampunk projects

Also from Kaisercraft are some lovely Vintage themed and Background texture stamps.
All stamps are clear acrylic 'cling' stamps. Use with your acrylic blocks.
Vintage Love


Graffiti


Wednesday, 18 July 2012

£1 Button Assortments...

Our £1 Button assortments are always popular, 30g for only £1.

It is a random assortment so you never know what you are going to get!

We have a couple of  new colourways...


...and the return of old favourites

Sunday, 13 May 2012

Never Ending Father's Day Card

Fabulous card from the very hardworking Katrina.

Fathers Day card - This is a never ending card made from the wonderful Craft House Press Mens, travel and Sport CDrom. Although you could make this for any occasion and with any paper.
You will need to print off 2 pieces of backing paper from the CD onto printable card, on both sides, this makes it easier to decorate. I used the vintage sport paper in the faded image ( the CD gives you each backing paper in a normal and faded )
You will also need to print off the sheets of old Tea cards that match the sport you want to do, my Dad is a football fan so I chose football as my sport but there is rugby, cricket,cricket, golf and even some horse racing.
Also a sheet of the balls that can be cut into borders and the Scrabble tile alphabet sheet.

Now we are ready to make the card. From your printed card cut 4 pieces 6 x 3" . With the pieces portrait score a line on them all 1.5" from the top and from the bottom. Take 2 of your pieces and lay them next to each other landscape, so they are touching, on your table so the score lines are running in the same direction, top to bottom.
Match up the score lines rather than the edges of the card, if they don't quite match we can trim them later. Apply double sided tape to the outer 4 corners of your 2 pieces.
Take the other 2 pieces of card and with the score lines running right to left place them on top of the first set.
Your magic card should now fold in a never ending sequence. It may need a little coaxing the first time and perhaps burnish the edges so they are well creased but after a couple of times it should run smoothly. If it is sticking a bit just trim a slither off the side.
Now all you need is to decorate with the tea cards and borders. Just be a little careful where you put your images that you are not sticking anything over any score lines as that will stop the card from working.
Use the Scrabble tiles to create your greeting and then play!!


Introducing Katrina

 Our new wonderfully talented Design Team Member...
My photo


Katrina Rollings

Hello, my name is Katrina Rollings. I live with my hubby Andrew and 3 very tame cockatiels ( well 2 very tame, the other we are working on ) in Bristol.
I have been crafting most of my life, my Mum teaching me tapestry and sewing, then went on to crosstitch. I bought my first rubber stamp at a stitching fair over 20 years ago and was hooked. That lead me to scrapbooking and then about 6 years ago a friend introduced me to ATCs and my love of mixed media was born. I love the freedom that Mixed Media gives you. To be able to play with paint, ink, paper, anything you fancy really, even that ticket stub you picked up on the way home!! My favourite images and embellishments have to be vintage ones, so I am so excited to become a member of Sarah-Jane's design team. I am so looking forward to working with her fantastic products!
When I am not in my craft room I love to read, bake, watch old films or be out with my camera, Andrew and I are both keen photographers. I also look forward to our walking holidays in Austria, of course a journal, pack of blank ATCs, scissors, glue, pens, stamps and ink get snuck into the suitcase!! 

Travel Tag Book
Craft House press collage sheets - New York and Loyd Express
Manila Tags x 3
Distress ink - Tea dye, Old paper and Walnut ink and applicator
Photo from old photo collection
Slide mount
Old bus tickets
Gold safety pins
Garden string
Book papers
Travel themed rubber stamps - my own
Butcher twine - my own
How to make it -
Cut out the 2 large travel tags from the New York collage sheet. Distress the cover tags and the 3 manila tags, front and back, with the distressing ink. Cut out all the images from the 2 collage sheets and use them as well as some strips of old book paper and other ephemera to collage both sides of the tags and inside of the front and back covers. To make the slide mount, distress with ink, stamp with a script stamp and leave to dry. Tear a square of book paper, add an old bus ticket and distress with ink. Stick to middle of slide mount and stick together, punch a hole in the top and add to book with a safety pin. Tie everything together with string to finish off.
Cover

Page 1

Page 2

Page 3

Page 4

If you'd like to see more of Katrina's fabulous artwork and projects visit the Gallery and her Blog.
You'll also find her artwork scattererd throughout the website.
Thanks Katrina for joining us, we look forward to more of your wonderful work.