Sunday, 30 October 2016

Halloween frame

Hello and happy Halloween from Design elf Katrina. Today I have a mixed media frame to show you using the new Halloween stamps from Stampendus and the MDF frames from Creative Expressions


         I decided to colour her using paper piecing. For those who don't know paper piecing is, it's a way to colour your stamped image by using different papers. So for this image I stamped the image to a skin coloured card then I stamped her again onto a purple paper and cut out just the coat part of the image. I then stuck it to the skin coloured image. She then had a purple coat. You keep doing that onto different papers or coloured card until you have the effect you want. A small sharp pair of scissors really help with this.

    Once I had complicated the girl I cut her completely out from the background. I still wanted her on her background so I stamped it again but this time I cut away the Halloween word. This was because I wanted to make the whole image fit in my frame and it was a tiny bit too big. So I stuck the Halloween word back onto the background to make it fit into the frame.


    I then painted my MDF frame with black paint and using some of the Creative Expresions waxes to highlight some of the areas.

 I then took my PVA glue and drew some swirls with it over the frame. Then before it dried I tipped some Frantage black glass glitter over the top.

Once it was all dry I could stick my stamped image to the backing of the frame and the stick the frame over the top.  

         There, all done and ready for Halloween.  

                        You can find the stamps in The Fruit Pixies Etsey shop -  https://www.etsy.com/uk/listing/470878048/haloween-sprite-cling-stamp-pixie-elf?ref=shop_home_active_51            

                                    You can find the MDF frames here
 - http://www.thefruitpixie.co.uk/creative-expressions-mdf-690-c.asp

                                    You can find the wax here -
          http://www.thefruitpixie.co.uk/creative-expressionscosmic-shimmer-gilding-wax-678-c.asp

                                       and the glitter I used here -
http://www.thefruitpixie.co.uk/frantage-crushed-glass-glitter-black-18299-p.asp


  I really hope you liked my Halloween frame and have a very happy and safe Halloween                                                                                                                     Love Katrina

Thursday, 27 October 2016

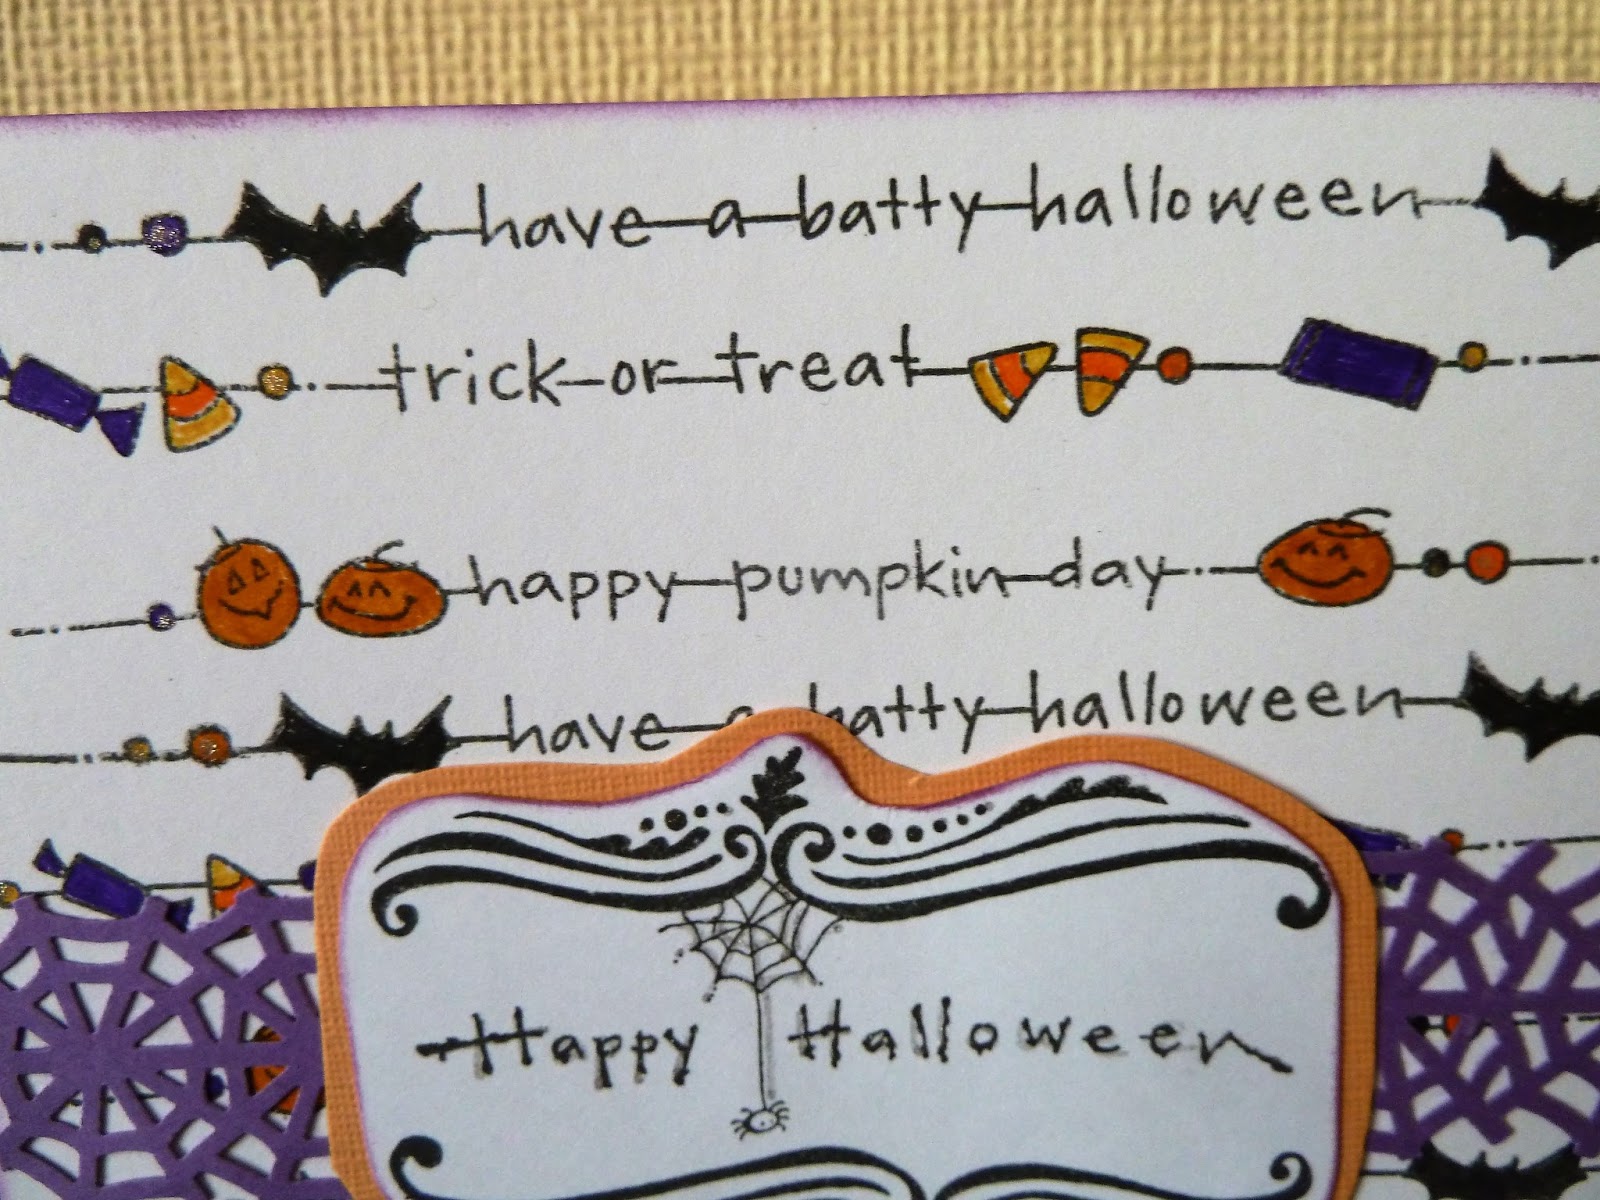
Happy Halloween Card

Hello, design elf Katrina here again. This time I have some spooky Halloween projects to share with you, well not that spooky actually but they are really quick and easy to make to send to your friends and family at this spooky time of year.

   To start with I have a really quick but fun card to make. I love these new stamps by Stampendous! They stamp beautifully and I find stamps like these really handy to have, you can use then on the card as I have here or inside as well. They would also look cool around the address on the envelope or to make Halloween party invites. Because they are neither for girl or boy they have so many uses. They would also be really handy for scrapbooking or project life.


I took 5 inch square card in white. I then put the 3 stamps ( all the stamp strips are separate ) onto my block, you get 4 stamps but the other stamp has a little spider on it and is made to be used virtually. I stamped them 4 times and then coloured in the little icons. 


The purple card spider webs were punched out using a Marther Stewart punch. 

The sentiment stamp is the Stampendous! cling Halloween Brackets stamp which I stamped onto white card and cut out. I then stuck it onto orange card and cut it out again leaving a small amount of the orange card showing.

To finish the card off I added some dabs of my glitter pen and sponged some purple ink around the edge.

There we are, quick easy and fun but still a stylish card to send out.

I will be back again soon with more Halloween project ideas, till then take care
                                                        Love Katrina

Sunday, 9 October 2016

Colourful bunting

Hello, design elf Katrina here with a lovely colourful bunting project for you.


    For the base of my bunting I used the Creative Expressions MDF Bunting which I then covered with the papers and words from the Craftwork Cards Bohemian Dreams.

   Here is a close up of each piece of bunting -


I made up 2 rosettes which I made in the same way as I showed on the last post and added buttons to them. The rose and stamp are from the Craftwork cards Bohemian paper pack as is the butterfly. The dots are Craftwork cards Candis.


As you can just see on this one I painted the sides some of my bunting with a red paint, others in blue. I then covered it with paper from the Craftwork cards Bohemian Dreams. The large letters are chipboard ones I have had for years at home which I painted . I cut hexagons using a die out of the different papers in the Bohemian Dreams paper pad and added a stitch look with a fine liner pen. The words are also from the paper pad as is the little stamp. I then added buttons and a lemon Dahlia cabochon along with some more of the Candis.


Here are more of the papers cut into hexagons along with some more of the collage pieces and words, also from the paper pad. I also used a button and this time a blue Dahlia cabochon.


On this one you can see the stitching I drew around the hexagons I cut from the paper. I also used more collage bits and words found in the paper pad as well as a lime Dahlia cabochon and some more of the Candis too. 


Much the same was used again, paper from the paper pad, buttons and Candis and this time a white Dahlia cabochon.


For the final piece of bunting I again used paper from the pad to make the rosettes, a butterfly from the kit too as well as some of the collage pieces cut from the papers and a few Candis. 


To thread the bunting together I used several ribbons that matches the colours of my bunting to give it a festival look. It hangs in my craft room by the window and the ribbons flutter nicely in the breeze.

This is a lovely project to make and I think these papers really lend themselves to it with their bright cheery colours. The pad also has lots of lovely words that also worked so well with this project.

You can find the papers I used here - 
http://www.thefruitpixie.co.uk/craftwork-cards-8-x-8-collection-pack-bohemian-dreams-25673-p.asp

the buttons here - 
http://www.thefruitpixie.co.uk/button-assortment-brights-9821-p.asp

the Dahlia Cabochons here - 
http://www.thefruitpixie.co.uk/beads-76-c.asp

All sorts of ribbon here - 
http://www.thefruitpixie.co.uk/ribbons--trims-ecfb8nproducts179curpage-2-179-c.asp

I hope you liked my bunting project and will come back to visit us soon.
                                                                                Love Katrina.


Friday, 9 September 2016

Craftwork Cards Bohemian Dreams Rosette card

Hello, design elf Katrina here. It's been a while since I posted last as I have been battling my migraines again. Unfortunately the worst thing for me to do while I am in a migraine phase is look at a back lit screen like a laptop or tablet. Now though I am on the mend and able to post again!

   So today I am going to show you how I made this really fun card using the Craftwork Cards Bohemian Dreams kit.


These rosettes are very easy to make and you can make them any size you like. The only thing you need to keep in mind is the larger the rosette the wider and longer the strip of paper needed but you can easily stick 2 strips together to get the length you need. I would do that after you have scored and folded them.

OK, to make your rosette you will need a strip of paper, a score board ( you could use a ruler to measure and then fold but it dose take a bit of patience to do that but it can be done ) and some wet glue.


First cut your strip of paper, this one is about 1 inch wide, place on your score board, I am using a Hougie Board on the cm side.


Score down each mark and then fold up as shown. Now if I wanted a larger rosette I would use a wider strip of paper and score and fold a second or even third strip and then stick them together.


Glue your folded strip into a circle using a wet glue as shown. I do mine so the pattern you want for the front is on the outside of the circle, you will see why in the next step. Then cut 2 circles of card or paper. These circles are the top and bottom of your rosette and give you a base to glue the rosette too. I have the larger one on the bottom and the small one on the top. You can use any scrap card for the bottom as it won't be seen but the top one needs to be from a coordinating paper or card as it will be seen.


Take your larger circle and put a generous amount of wet glue onto it and put it to the side but within reach. Then the bit that some people find a little tricky, take your rosette and using your fingers push gently out and down on the top of the circle. Your rosette will then fold down flat. While keeping your fingers on the flattened rosette bring your glue covered circle in and place glue side down onto the middle of your flattened rosette. If you let go it will spring back up again, if that happens just do the same as you did before to flatten it again. That is why you have the back on the inside of your circle. If you change your mind or forget that bit you can turn them over carefully but they can sometimes fight back!!


I then put something on top of the rosette immediately to hold the base in place for it to dry.


Once it has dried you can turn your rosette over and glue the other circle onto the top. I still put a small circle onto my rosette even if I am going to add a button or other decoration as it helps stabilise the finished rosette.

So that's how you make your rosettes, all I did to make up my card is make several rosettes in different sizes using the different papers in the pad, of course the are all double sided which gives you so many choices!


I used a couple of the papers as a background and then layered up the rosettes and added some buttons.


To finish off I also added some of the Candi that comes in the kit using tiny foam pads and one of the sentiments from another of the papers.

I was really pleased with this card, so bright and summery!

You can find the Craftwork cards Bohemian Dreams paper kit here - 
 http://www.thefruitpixie.co.uk/craftwork-cards-8-x-8-collection-pack-bohemian-dreams-25673-p.asp

A wonderful selection of buttons here - 
http://www.thefruitpixie.co.uk/buttons-34-c.asp

3D foam that fit the Candi here - 
http://www.thefruitpixie.co.uk/stix-2-3d-foam-pads-black-2045-p.asp

I hope you like my card and found the tutorial helpful. For my next project I have used more of the rosettes so if you like them come back again to see what I have come up with.

Till then, happy crafting, love Katrina


Friday, 12 August 2016

Craftwork Cards Bohemian Dreams quick cards

Hi, design elf Katrina here again. I have been using the beautifully summery Craftwork cards Bohemian dreams paper kit. I really, really love this kit. Its right up my street.

    What I love about Craftwork cards and I have been using their products for many years now, is they give you plenty of each paper design so you can cut them up without feeling that you are wasting a design.

 So this is what I have done with these cards, they were very quick and easy to make but I think look modern and fresh.

 For the first 2 cards all I have used is the papers. So if you have never made a card before you could easy make these cards and I promise you will be up and running.


For this card I cut a square of the wheelbarrow paper around the pattern on the paper and then just cut out some butterfly's from another of the papers in the pad. The sentiment was also from one of the papers. All you need to make this card and in fact all of the cards in this post, is this paper pack and a pack of cards and envelopes. I will add all the links below.

For card 2 - 


Again a super easy card, just using the papers from the pack. I cut the typewriter out from one sheet and then used some of the other paper designs ( remember they are all double sided so have a different pattern on the reverse ) to cover the bottom part of the card to "ground" your main image. I then punched some little hearts out of the red paper using one of my heart paper punches and added one of the sentiments from the papers which is full of little sentiments. So there you have it, another card just using the papers.

Card 3 - 


As well as the wonderful papers in this kit you also get some lovely pre-cut toppers. I have used one of them for this card. Again very simple, I started by rounding off the corners of my card, you can buy a punch to do that for you but you can also just round them with scissors. I then cut a square of the paper and also rounded the corners there. I cut the red scalloped circle from one of the red papers using one of my dies and added one of the borders, again cut from one of the papers. Again a nice card made just using the card kit and a card blank.

As well as the papers, all double sided and the toppers in this kit, you also get pretty butterflys and bunting, all cut out for you and of course the Craftworkcards famous Candi!

You can find this lovely kit in the shop here - 
http://www.thefruitpixie.co.uk/craftwork-cards-8-x-8-collection-pack-bohemian-dreams-25673-p.asp

The card packs here - 
http://www.thefruitpixie.co.uk/card-blanks-374-c.asp

A set of the scalloped circle dies here - 
http://www.thefruitpixie.co.uk/spellbinders-die-petite-scalloped-circles-large-25815-p.asp


I hoped you like my quick cards using this lovely kit from Craftworkcard and will give card making a try if you have never tried before. I promise you can get this great results with this quality kit.

If you have any questions just ask below and I will be happy to help. Also you can go to our Facebook page and ask there too.
https://www.facebook.com/thefruitpixie/

So until my next post, happy crafting!
                                                        Love Katrina